|| BACK ||
   
 
A is for Airway

This means positioning the patient's head so that it is hyperextended, by tilting the head and lifting the chin

Causes why the airway could be blocked:1) the lax tongue falls back
                                                            2) Foreign bodies such as food, vomitus, false teeth etc

TRIPLE MANOUVRE

  1. Place one hand on the fore head and the other hand behind the neck.
  2. With a smooth movement the head is tilted back and the neck lifted up such that the chin is above the level of the nose – “HEAD TILT, NECK LIFT” method. This is described as “sniffing the morning air” position.
  3. An alternative is to place the forefinger and thumb on the chin and lifting the chin also known as a “HEAD TILT, CHIN LIFT” method.

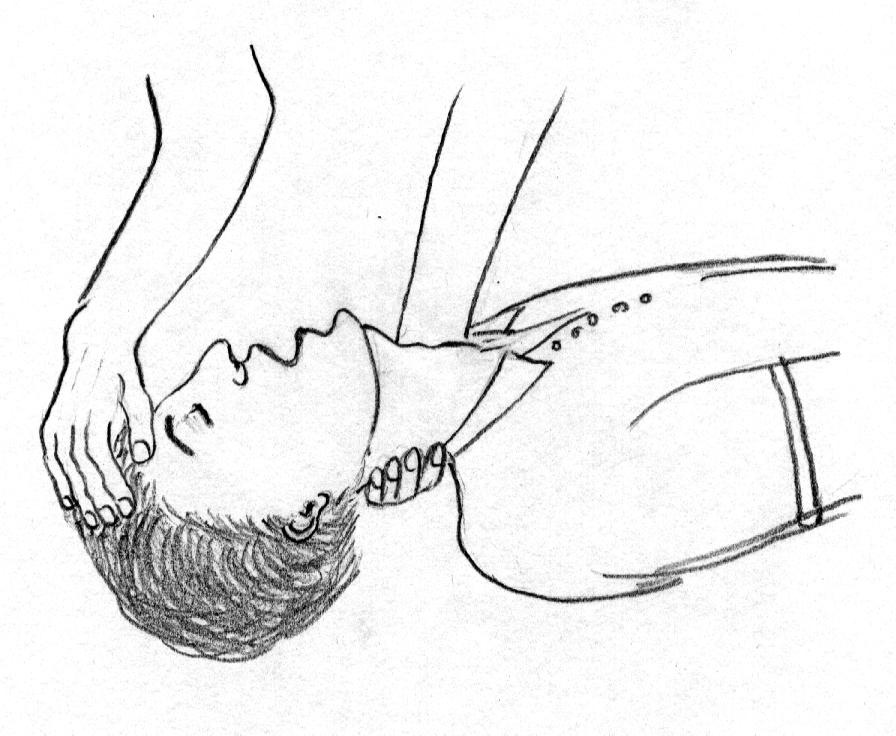
 A combination of the above two methods known as Triple maneuver

MODIFIED JAW THRUST METHOD
Is where the jaw is displaced anteriorly (in this case - upwardly) without moving the neck.
This is indicated in cases where injury to the neck is suspected (RTAs, hanging, fall from a height) such that head-tilt must be avoided which could aggravate spinal injuries, compress the spinal cord and the vital centers.

Support the maxillae between the palms with elbows resting on the table

  1. Run your index & middle fingers back along the jaw line till you come to a space behind the lower jaw, in front of the ear lobe.
  2. With a proper grip, pull the jaw forward. The head must be completely motionless during this maneuver.

All maneuvers elevate the mandible and as the tongue is attached to the lower jaw, it is lifted up thus opening the airway.

Visible material can be removed by using your fingers to scoop it out or wipe it away.
 
The person may have dentures. Leave well fitting dentures in place. If the dentures are loose remove them.

Look, Listen, Feel

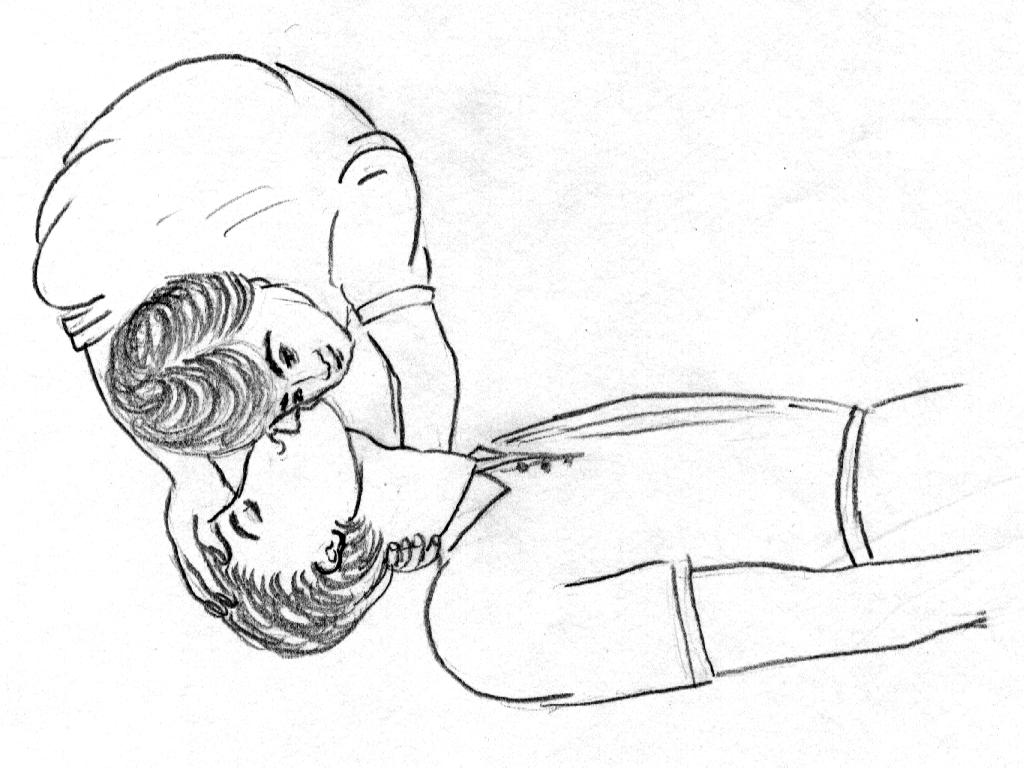
Notice how the rescuer is kneeling at a level that is next to the patient's upper arm.  This position is useful when (or if) it becomes necessary to administer chest compressions. Further notice that the rescuer's ear is right above the patient's nose and mouth, and that the rescuer has turned her head so that she is looking at the patient's chest. Hence  the description, "Look, listen and feel."  Look at the chest to determine if it is moving.  Listen for the sound of air moving in and/or out of the nose and mouth.  Feel for the movement of air from the nose and/or mouth. A person who is unconscious may take infrequent gasps of air, but this is not breathing.

In case of no evidence of breathing rescue breaths are initiated. In case there is no rise or fall of chest and resistance is encountered in the breaths then probably airway is blocked and must be cleared before proceeding to the next step of breaths.


B is for Breathing

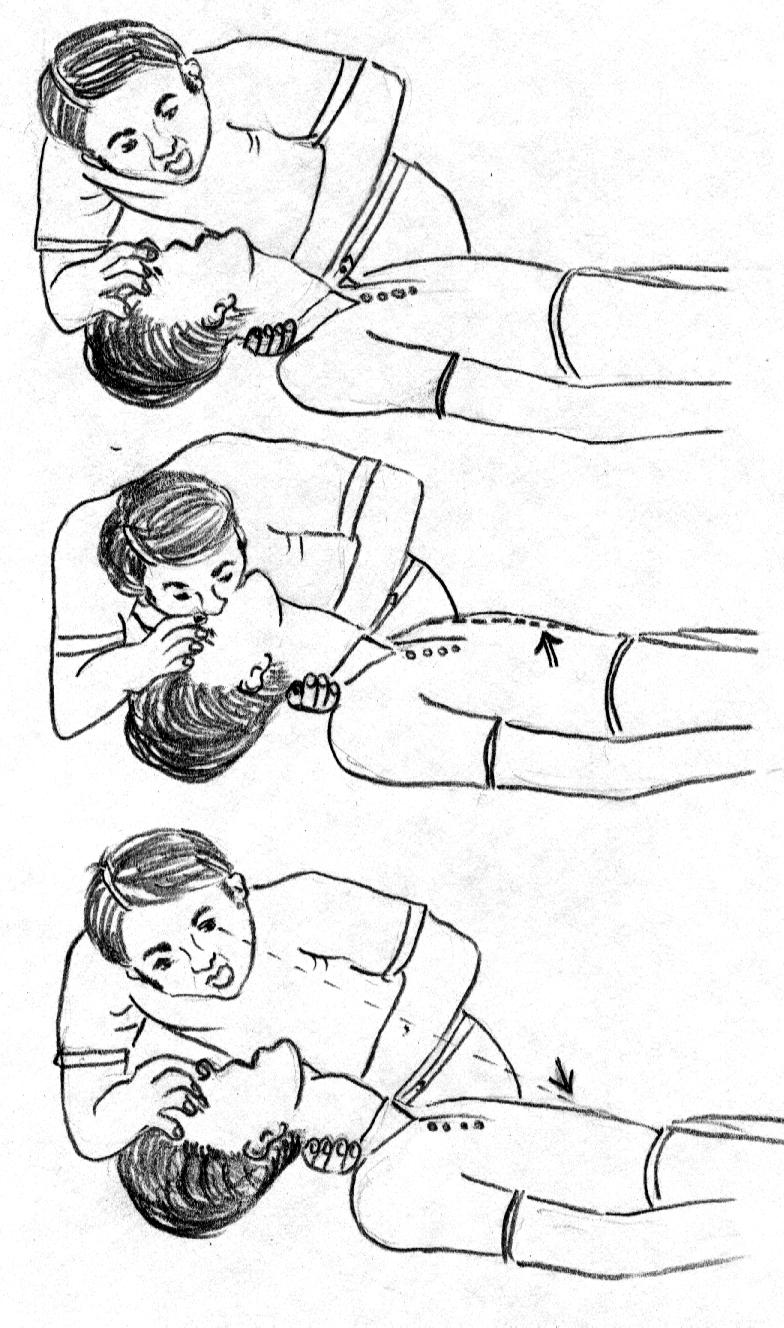
Methods for delivering rescue breaths – Mouth to mouth
                                                           Mouth to nose
                                                           Mouth to nose & mouth                                              
                                                           Mouth to mask and Mouth to stoma

Seal the nose by pinching the nostrils so air can't escape while you blow air in through the mouth. Take a breath, open your mouth and place it over the person's slightly opened mouth. Take care not to lose head tilt. Maintain a good seal around the patients mouth Now blow to inflate the person's lungs and look with the corner of your eyes for the chest rise.
Start with two breaths only.


Each time rescue breaths are given ensure –  the airway is opened
                                                                    -- the chest rises with each breath

Mouth-to-Nose is used where the casualty has sustained facial injuries that preclude  using the mouth. This is indicated in cases of vomiting, bleeding injuries to the mouth and poisoning. The rescuer closes the casualty’s mouth, covers the nose with their mouth, breathes gently, then releases the casualty’s jaw to allow exhalation.

Mouth-to-Nose-&-Mouth is the preferred method when resuscitating a child, as the rescuer’s mouth can cover and seal the child’s nose and mouth.

Mouth-to- Stoma is used for resuscitating a casualty who breathes through a stoma, an opening in the neck, through which the casualty normally breathes. The rescuer breathes through the stoma directly into the airway while blocking the nose and mouth.
Casualties who have a stoma often wear a scarf or fabric filter over the stoma. Be alert for the presence of a stoma under such wrappings

Mouth-to-Mask is the most desirable method for rescue breaths as it lessens the risk of cross-infection and is more acceptable to many people than mouth-to-mouth. Masks come in various forms but they are used similarly.

The mask is fitted firmly over the casualty’s nose and mouth and the rescuer delivers rescue breaths via the valve or tube thus avoiding direct contact with the casualty’s mouth or expired air.
C is for Circulation

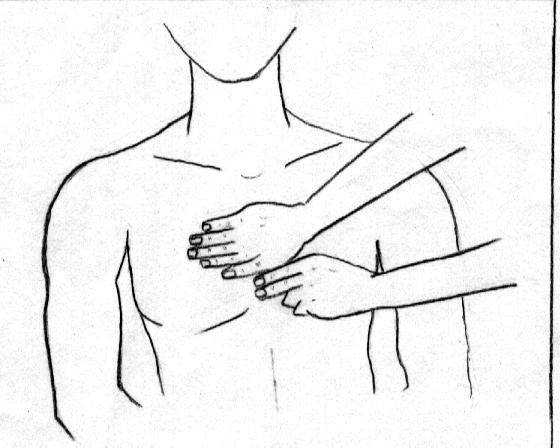
Check the CAROTID Pulse

After giving 2 quick breaths you need to check for a pulse.

Place two fingers gently on the thyroid cartilage, then slide them off to the curve between the sternocleidomastoid and the Adam's Apple. Feel with the flat portion of the fingers, not the tips. Don't push too hard and only feel one side of the neck, for about 10 seconds.
Do not feel for both the pulses at the same time. Feel the pulse with the index and middle fingers. Do not use the thumb as it has a fairly strong pulse and sometimes you may assume your own pulse is the patients.

If there is a pulse:
You will need to keep breathing for the person until help arrives. This means doing mouth-to-mouth resuscitation only (no chest compressions) at a rate of one breath every 4 seconds, this is about 15 breaths per minute. Check the pulse every couple of minutes.

If there is no pulse:
If there is no pulse you will need to circulate the person's blood as well as breathe for them. It is important to push on the chest at the correct compression point. Improper hand positioning can cause cracked ribs and lead to ineffective breathing.

Start chest compressions

Locate the correct compression point:

    • Place your middle and index fingers of one hand on the lower margin of their ribs.
    •  Move your fingers up the costal margin to the xiphisternum (notch where the ribs meet the breastbone, in the centre of the lower part of the chest)
    • Place two fingers(index and middle) of the other hand immediately adjacent i.e. cephalad or headwards to the index finger at this point
    • .Place the heel of the left hand adjacent to these two fingers cephalad in direction. Heel of your hand must be exactly in the midline
    • Cover the left hand with your right loosely intertwining your fingers. Make sure your knuckles do not compress the chest.
    • Compressions should be rhythmic with equal compression and relaxation, as this allows the heart to fill with blood between each compression. In adults you depress the breastbone 4 to 5 centimeters, or 1.5 to 2 inches, with each compression.
    • Ensure that the movement is at the shoulder and that the elbows are straight and locked at all times. Compression rate should be maintained approximately at 100 per minute. Count loudly as your give compressions : one, two, three, four etc
    • How do I know how far to push on the chest during CPR?
      The compression depth for an adult is 1.5 to 2 inches (40 to 50mm). As a guide compress to a depth of about one-third the depth of the depth of the person's chest or until you feel resistance from the chest wall. It is best if the initial compressions are guarded to test chest compliance.
    • Do 15 compressions followed by 2 breaths:
      The correct timing is a minimum of 60 compressions per minute, that's 4 cycles of 15 compressions to 2 breaths every minute.
      NOTE: Each consecutive time of repeating chest compression, re-position your hands each time using routine landmark checks as specified before. Never assume that your hands are in the right position.
      After 5minutes of CPR, recheck for pulse and spontaneous breathing before starting chest compressions again.
      When should I stop CPR?
      There are no limits. Do CPR for as long as you can. Keep going until:

    • The person recovers i.e. makes a movement or takes a spontaneous breath
    • An ambulance officer or doctor tells you to stop
    • It becomes impossible for you to continue